


Aadhaar Card Update: NRIs Do not have to Wait for Over 6 Months to Apply for Aadhaar
Thu 26 Aug 2021, 22:21:45
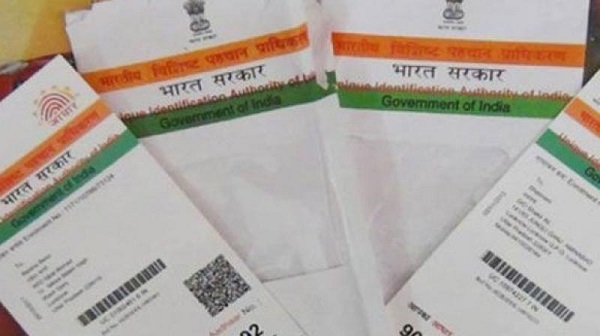
The Unique Identification Authority of India (UIDAI) is the issuing body for Aadhaar, one of the most important pieces of identification that an Indian citizen can carry nowadays. Due to its high level of integration into the daily aspects of life, it has gained significant importance. The Aadhaar is available for Indian citizens as well as for Non-Resident Indians (NRIs). Where NRIs had to previously undergo a mandatory waiting period, they no longer need to.
In May of 2020, Finance Minister Nirmala Sitharaman had proposed that NRIs holding Indian passports should be given Aadhaar cards on arrival to India without the mandatory waiting period. This proposal was brought to the table during the Union Budget. During the Budget announcement, she suggested that NRIs forego the 180-day waiting period.
As recently as August 26, 2021, the UIDAI also issued a tweet regarding the same, wherein the entity informed citizens that NRIs need not wait for 182 days. The tweet further added that NRIs with a valid Indian passport may apply for Aadhaar on arrival to India.
The tweet read: “Non-Resident Indians (NRIs) need not wait for 182 days. NRIs with valid #Indian #passport may apply for #Aadhaar on arrival. Visit your nearest #AadhaarEnrolment Centre: https://appointments.uidai.gov.in/easearch.aspx. For more details, call at 1947 or write to us at help@uidai.gov.in”
Step 1: Start by visiting any Aadhaar enrolment centre near you and make sure that you are carrying a valid Indian Passport with you when you go there.
Step
2: You need to then fill in the details in the enrolment form that the Aadhaar enrolment officer gives you.
2: You need to then fill in the details in the enrolment form that the Aadhaar enrolment officer gives you.
Step 3: Make sure that you complete the declaration for NRI enrolment, which is slightly different from the usual process. Read and sign the same in your enrolment form.
Step 4: Ask the operator to enrol you as NRI.
Step 5: Give your Passport as Proof of Identity to the enrolment officer who is handling the process. You may choose to use your Passport itself as Proof of Address and Date of Birth proof or give some other valid document. Ideally, you want to use the passport across the board.
Step 6: You need to complete the biometric capture process, which involves giving the fingerprints to all 10 fingers. You will also need to undergo an Iris scan to add to your biometric data verification.
Step 7: You need to provide a passport size photograph. The government does not accept stores photographs and so will take your picture on the spot and print it.
Step 8: Check all details on the screen (in English and local language) before you allow the operator to submit your application.
Step 9: Collect the acknowledgement slip/ enrolment slip that has your 14-digit Enrolment ID and Date and Time Stamp. You will need to wait the typical 90 days like the average citizen as this is the amount of time it takes for the creation and dispatch of a typical Aadhaar card. You can track the progress online with the use of your enrolment number that was provided by the enrolment centre.
No Comments For This Post, Be first to write a Comment.
Most viewed from General


Most viewed from World


Todays Epaper

English Weekly


AIMIM News


Latest Urdu News
Most Viewed
May 26, 2020
Which cricket team is your favourite to win the T20 World Cup 2026?
Latest Videos View All
.jpg)
.jpg)
.jpg)


Like Us
Home
About Us
Advertise With Us
All Polls
Epaper Archives
Privacy Policy
Contact Us
Download Etemaad App
© 2026 Etemaad Daily News, All Rights Reserved.